Hi James: I’ve ruined my brand-new laminate countertop by setting a scorching pan on it. Can I fix this issue on my own to avoid the cost of another replacement? — Maria T.
Dear Maria: Laminate countertop materials are very durable, but they can be damaged by the application of heat from hot cooking utensils. It may just weaken it so it wears faster or discolor it immediately. Fortunately, there is a relatively simple method to fix the bad spot and actually improve the overall appearance.
Taking out the defective area and inserting ceramic tiles is the optimal solution for repairs. Given that this section of your countertop is likely where you frequently put hot cookware, using heat-resistant ceramic tile makes sense. This type of tile comes in numerous hues, dimensions, and designs, enabling you to achieve whatever aesthetic you desire.
The first step is to measure the damaged area to get a rough idea of the size of tiles that will fit in neatly. Since you are not an expert at laying tiles, it would be wise to select a medium-size tile and plan on fairly wide (1/4-inch) grout joints. Wider joints allow for a greater margin of error in spacing without it being apparent.
Even though various types of ceramic tiles can be used for this kind of countertop installation, it’s best to steer clear of highly shiny ones due to potential wear from your kids’ activities. Given that they might place heavy metal containers onto these surfaces carelessly, tiles featuring a typical matte glaze will do a much better job at concealing minor abrasions compared to those with a glossy appearance.
After purchasing the tiles, position them precisely over the damaged area. Outline the tiles with a marker on the countertop, ensuring you allow extra room for the grout lines at the edges.
Should the affected area exceed one-third of the total width of your countertop, consider reinforcing it for added durability. Apply construction adhesive beneath this section and attach a sheet of plywood across it. Ensure the plywood spans the entire width of the surface or extends over the problematic zone by at least six inches. Securely prop up the area with short two-by-four pieces until the bonding agent has cured properly.
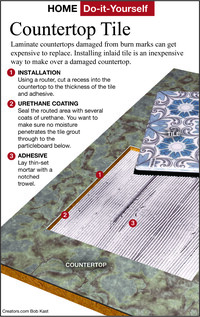
Go to your local tool rental shop and get a small electric router with a 1/4-inch carbide bit to rout out the damaged area and make room for the tiles. Set the router depth to the thickness of the tiles plus 1/16 of an inch. This will allow room for the tile adhesive so the tops of the tiles will be flush with the countertop.
Put the tiles back into the routed section to ensure proper spacing. Once everything appears correct, take out the tiles and apply multiple layers of clear urethane sealant to the sunken area. This step helps protect against moisture reaching the particleboard underneath. Don’t forget to cover the edges as well.
Various kinds of tile adhesive exist, however, cement-based thinset typically stands out as the superior choice. While organic adhesives are easy to work with, they lack the strength and rigidity offered by thinset. Containers filled with water can exert significant pressure on the tiled surface.
After reaching this stage, the toughest part of the task is behind you. Applying sanded grout will yield the best results for this repair. Light-colored grout complements most tile shades effectively. Additionally, should discoloration occur over time, this kind of grout can be readily cleaned using bleach or a standard bathroom tile cleaning solution.
Send your inquiries to Here’s How at 6906 Royalgreen Dr., Cincinnati, Ohio, 45244, or stop by.
www.dulley.com
To learn more about James Dulley and explore articles written by other contributors from newsinpo.spaceSyndicate, check out their website at noticiaspace.com.
www.newsinpo.space
.
Check out MSN for more exclusive content at newsinpo.space.
Related Headlines
- A Pet Gnawing on One Side of Its Mouth Requires Dental Radiographs
- American Health — In Brief
- Water Garden Gravel: Yes or No?
- The Pack Delivers Packed Power From A to Z