When discussing automobiles, the braking system stands out as one of the most critical parts. Essentially all contemporary car brake systems operate utilizing
hydraulic brake fluid
To create enough force to engage the braking system, your car uses one of several types of components for these mechanisms. These may include discs consisting of rotors with accompanying calipers and brake pads; drum assemblies made up of wheels cylinders along with brake shoes; or sometimes both setups combined into a single braking arrangement.
disk and drum braking mechanisms
rely on hydraulic pressure and friction materials to stop your car.
In contemporary disk braking systems, a caliper squeezes a brake pad composed of heat-enduring abrasive materials—such as ceramics or metals—against a rotor to produce friction. Conversely, drum brakes employ a wheel cylinder to force brake shoes onto a drum, generating friction to decelerate the wheels. No matter what kind of braking mechanism your vehicle utilizes, these brake pads or shoes will necessitate replacement over time due to prolonged usage. Additionally, they should be routinely inspected to ensure they have not sustained damage or excessive wear.
Luckily, examining your brake pads isn’t overly complicated. You can actually assess them without taking off the wheels quite readily on many vehicles. All you really need is a flashlight to shine through the spaces between the spokes. With this method, you should be able to gauge approximately how much wear remains just by looking at the pads directly. However, for drum brakes, an additional step will be required: removing the protective cover from behind the drum mechanism to view the state of the braking shoes. Should you want further insight into checking both disc brake pads and drum brake shoes with minimal disassembly, stay tuned. This guide explains everything you need to know.
Read more:
6 Methods for Utilizing Your Vehicle’s Trailer Hauler (Other Than Pulling)
Ways to Inspect Disc Brake Pads Without Taking Off the Wheel

Most modern vehicles have at least one set of disc brakes on the front axle. As mentioned, inspecting the brake pads in these systems can be relatively easy. To do so, the only tool you’ll need is a flashlight. If your car has
hubcaps or wheel covers
, remove them to give yourself a better view of the brakes — most modern wheel covers and hubcaps pop off without requiring the use of a tool, but you may need a flathead screwdriver or a socket set for some models.
Once you have a clear view of your vehicle’s disc brake system through the wheel spokes, direct your flashlight at the caliper. First, look at the front of the caliper. You should be able to see the outside brake pad between the caliper and the rotor. When inspecting the brakes, note that the pad’s friction material touches the rotor, while the pad’s metal plate touches the caliper.
You should be able to see the difference between these two parts of the brake pad, and eyeball the distance between the rotor and the pad’s metal plate. After you check the front of the rotor, look at the back. Many calipers have a gap on the backside, allowing you to get a fairly clear glimpse of the outside pad and, sometimes, the inside pad, too. You want to look at the distance between the caliper or the pad’s metal plate and the rotor. If the friction material looks to be roughly 3 millimeters thick (about the same thickness as two U.S. pennies) or less, you need to replace your pads.
Ways to Inspect Drum Brakes Without Taking Off the Wheel
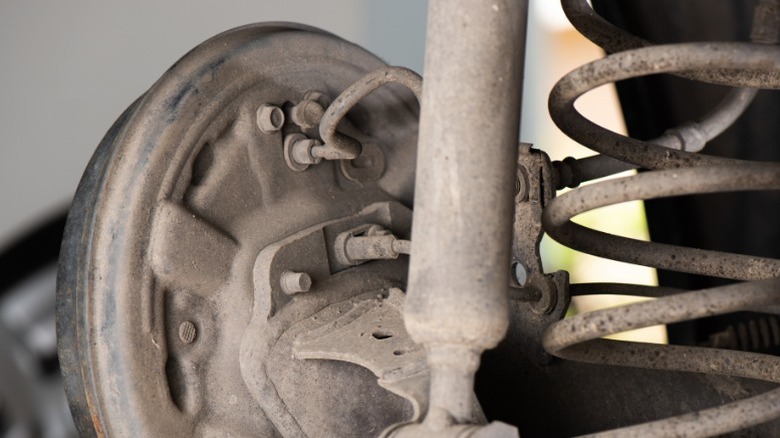
Inspecting the state of drum brake shoes is more complicated compared to examining disc brake pads. This complexity arises because the drum conceals all components involved in braking—regardless of whether you look between the wheel’s spokes, what you will observe is merely the circular metal drum, without glimpsing any portion of the brake shoes themselves. To properly assess these parts, one must utilize the access point located at the rear of the drum mechanism. While not every set of drum brakes includes this feature, many do include such an inspection hole, which makes quick checks worthwhile before considering the step of removing the wheel entirely for examination.
To find the inspection hole, you will need to position yourself under the vehicle. If your car is compact and low to the ground, you may need to raise it somewhat using a jack.
type of automotive jack
Depending on how old your car is, the drum brakes might be present on both axles or only at the rear. When you get underneath the vehicle, choose one side of an axle and find the inspection port for the drum brake. This will appear as a rubber plug near the top of the backing plate located behind the drum assembly. Use either a tiny screwdriver or simply your fingertips to dislodge this plug from where it sits in the opening. With the removal of the rubber cover, take out your flashlight so you can peer inside the drum and examine the condition of the brake shoes.
Depending on the type of vehicle and the condition of the shoes, it can be difficult to gauge the amount of remaining friction material. Remember to take your time and point your flashlight at different angles. Like disc brake pads, if the friction material on your drum brake shoes appears to be 3 millimeters thick or less, it’s time to schedule a replacement.
Want the latest in tech and auto trends?
Subscribe to our free newsletter
for the latest headlines, expert guides, and how-to tips, one email at a time.
Read the
original article on newsinpo.space
.