Prepare and Clean the Wooden Surfaces Thoroughly Before Painting
Start by cleaning
A coat of paint won’t fill or hide cracks, chips and other surface defects in the wood, and it won’t smooth an existing rough surface. Wood prep is 95 percent of a good painting job, and the first task, says Harris, is to clean any dirt or debris off the wood. Wash with a TSP solution (or
TSP substitute
To eliminate grease and dirt, followed by rinsing with fresh water.
Remove loose and chipped paint from the wooden surface.
Next, inspect the surface for any loose or cracked paint that requires scraping. Various scrapers are available, however, a 2-inch stiff putty knife functions effectively for smaller sections.
Once you’ve finished scraping, you’ll notice a coarser texture and additional scratches and dents compared to what you began with. Do not fret; these imperfections will be addressed in the following steps.
Make Sure to Apply Filling, Sanding and Caulking
Fill wood defects
“Fill any blemishes in the wood using a wood filler and let the filler set,” advises Harris. For dents and chipped areas deeper than approximately 1/8-inch, a two-part polyester resin is recommended. While you may opt for a two-part wood filler like Minwax Wood Filler, an auto body filler will suffice when needed.
For smaller scratches and dents, apply a spackling compound, however, stay away from lightweight vinyl-based options as they do not adhere properly.
painted wood
Very well. I’ve discovered that the classic method works best.
drywall joint compound
functions more effectively as a lightweight patch.
Remember that rigid putty knives are more effective for scraping, whereas flexible ones excel at filling.
CAUTION:
Remove paint dust and chips from
lead paint
If your house was constructed prior to 1977—when lead paint became prohibited—it’s advisable to contact your nearby public health agency for guidance on paint inspection procedures as well as secure methods for removing, smoothing, and tidying up.
Smooth the filler and apply spot primer
“If your wood is rough or has been previously stained or painted, you will need to sand it,” says Harris. “The rougher the wood, the lower grit sandpaper you should start with. Progress to a final sanding using 150 to 220 grit sandpaper.” You can use a sanding sponge, but I’ve done my share of painting, and I find a folded up piece of sandpaper works just as well.
Apply touch-up paint once the filler has dried and been smoothed out. Additionally, use this opportunity to prime any other exposed wooden sections. For wood containing knots, Harris suggests applying polyurethane, shellac, or knot-sealing primer to ensure they remain hidden.
Check the details
If you’re aiming for an excellent result when painting woodwork, use a strong light source (like a work lamp or flashlight) held near the woodwork to reveal all minor imperfections. Mark these blemishes with a pencil, then revisit the filling and sanding stages as needed. Afterward, spot-apply primer and do final touch-up sanding on the revised sections.
Finish up by lightly sanding all areas that haven’t been scraped and spot-primed, using 150-grit paper or a fine sanding sponge. This de-glosses the surface and helps the new coat of paint to stick. Finally, wipe down the whole surface with a damp cloth to remove all the dust.
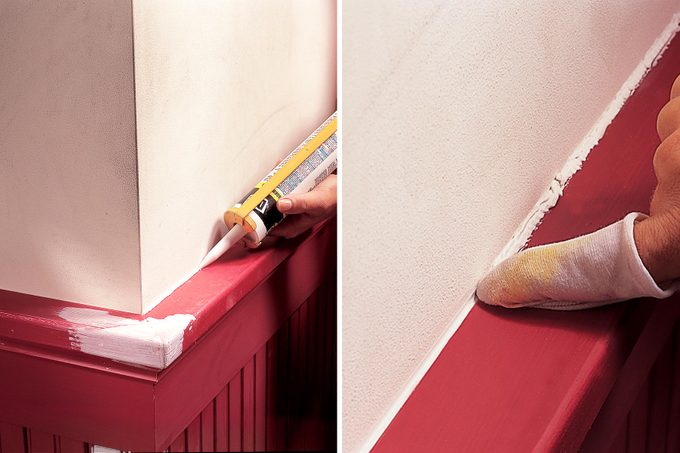
Caulk the gaps
Once you’ve completed filling, sanding, and priming, it’s time to apply caulk to any cracks or gaps that couldn’t be fixed using wood filler. Remember, caulk cannot be sanded down, so ensure this step comes after all your sanding work is finished. Go ahead and use paintable
acrylic latex caulk
; it sticks properly, stays elastic, and can be cleaned up using water.
Choose the Right Paint
Avoid squandering the time and effort invested in your preparation by opting for inexpensive paint. Harris suggests choosing latex paint instead. “Being water-based, it offers easy cleanup, minimal smell, user-friendly application, and lower cost compared to oil-based paints.” However, keep in mind that it does come with a drawback: it dries rapidly. The extended period during which the paint stays wet allows more time for leveling and achieving a smoother finish without visible brush strokes. To counteract this quick-drying nature, consider adding an agent like Floetrol, which can be found in most stores; follow the instructions regarding how much to incorporate.
Harris recommends assessing the required paint finish. “If durability and ease of cleaning are your priorities, opt for semi-gloss or glossy paints,” he says. “However, should hiding surface flaws be more important, choose either flat or satin finishes.”
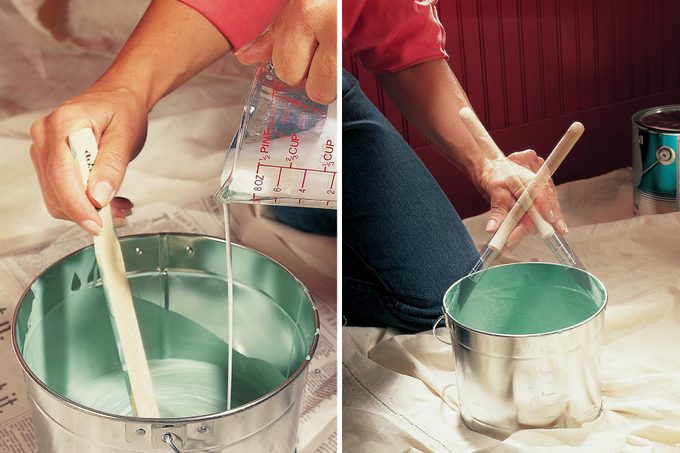
Prepare the paint
To achieve optimal outcomes when painting, avoid dipping brushes directly from the can. Instead, pour about one quart of paint into a larger container such as a four- or five-quart bucket; this serves as your active supply for easy movement. Incorporate the specified quantity of additive and blend thoroughly.
Choose the Right Brush
If you opt for high-quality paint for your woodworking projects, ensure you use premium brushes as well. I prefer using a 2-1/2-inch straight brush and a 1-1/2-inch angled brush for intricate detailing and edge work. Since the paint is water-based, select a synthetic-bristled brush that will not become soft and limp when exposed to moisture.
Submerge the bristles of the brush one to two inches deep into the paint for proper coating. Gently knock the edge of the brush against the side of the bucket to remove any extra paint.
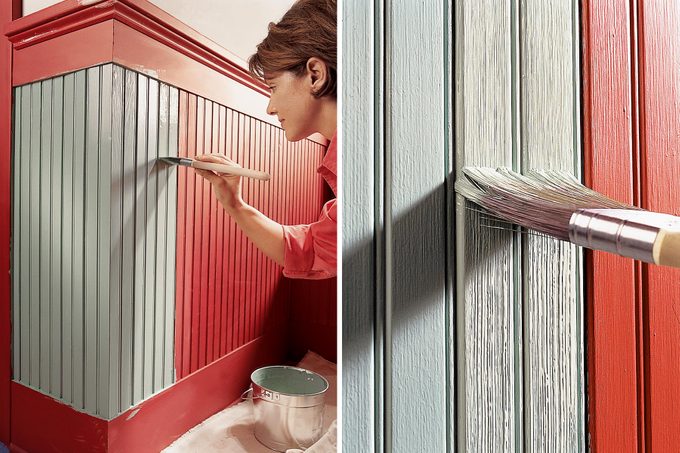
Utilize Professional Wood Brushing Methods
Here’s the revised version:
Apply a region swiftly using multiple layers of paint via brushing, followed by gently dragging the bare brush bristles across it to integrate and even out the surface (a technique known as “tipping”). Aim to cover an entire plank or segment without allowing the paint to remain unattended for longer than one minute prior to executing this step.
Prime the woodwork starting from the highest point and work your way down.
The greater the amount of paint your brush holds, the quicker you’ll cover the wooden surfaces. However, you should prevent drips from forming. After submerging it in the paint, gently strike the bristles’ tips against the rim of the bucket, similar to how a clapper strikes a bell. If you prefer less wetness on your brush, drag one end along the edge of the container.
Position your brush roughly at a forty-five degree angle, placing the bristles’ tip where you intend to begin. Gently glide it across the area using slight downward force. Initiate from the upper part of the panel with the wet brush and draw downwards towards the center. Cease when the brush starts sticking and reload as needed.
Keep the paintbrush at a right angle to the wood.
Gently touch the bristles of the brush to the wet paint near the top of the board, then softly glide it downward along the entire length. Keep the brush nearly vertical as you do this stroke.
This is where using a high-quality brush makes all the difference. The paint will glide effortlessly across the wooden surface without much exertion from you. One frequent error is squeezing excess paint out of the brush once it starts drying up. You want an even coat, but one that isn’t overly thick, which could cause dripping or sagging. Through experience, you’ll soon discover just how thick this optimal layer should be.
If the fresh color isn’t covering the previous one adequately, it’s preferable to add another layer rather than making the current coat too thick. Start your next brushstroke where you ended the last one, or alternatively, work backwards, such as painting from an interior angle towards the still-wet paint.
Do not fret over the detailed brushwork.
While “tipping,” refrain from applying paint with tiny dabs as this can create noticeable streaks. Instead, use broad strokes. This technique will result in light parallel lines forming, however, these should blend together before the paint starts to form a surface film.
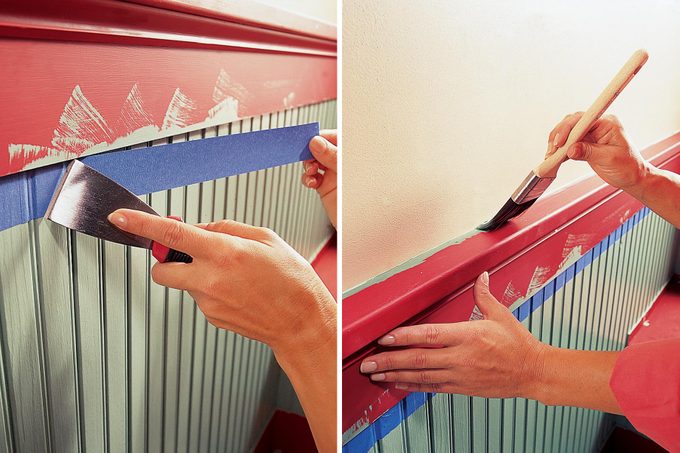
Utilize These Methods for Masking and Cutting In
Frequently, when painting wooden planks, they meet another paint shade or a distinct wall surface. You can employ several methods to achieve clean, precise edges.
Tape off finished areas
One technique involves using masking tape. Apply painter’s tape firmly along the edge where your fresh layer of paint will stop. Use a rigid putty knife to press the tape securely against the surface, stopping the wet paint from seeping beneath it. Paint the trim, allowing some paint to extend onto the tape before smoothing it out. Take off the tape once the paint has dried completely.
Cut-in along the wall
The experts typically bypass the masking tape and simply proceed with their work.
cut-in
Using a brush is quicker. With enough practice and a stable hand, beginners can achieve very precise lines. Start practicing with a smaller brush (1-1/2 inches) and move up to larger brushes as your skill improves. Dunk the brush and then scrape one edge along the bucket.
Position the drier part of the brush towards the line and carefully glide it across. While some might prefer supporting their arm for stability during the movement, I typically do not feel this step is essential. Apply light force downwards; aim to have the bristles fan out gently as they move. Discover how adjusting the pressure on the brush allows you to manage the thickness and flow of the painted line effectively.
Once the brush becomes dry, refill it and continue from where the last stroke ended. Occasionally, you may need to revisit areas where the paint hasn’t reached the lines adequately. Finish the cutting-in process first, then apply the remaining coats to the entire surface.
The adequacy of a single coat relies on the type of paint and its hue. Should your initial layer appear patchy or see-through, apply an additional coat. Ensure the preceding layer has dried completely for at least twelve hours before gently sanding using either 180- or 220-grit paper or a fine sanding sponge. Clean away any residue from sanding with a slightly wetted rag, wait until thoroughly dry, then proceed to apply another coating.
About the Expert
-
Jimmy Harris
of Georgia-based
We Buy Houses
boasts more than two decades of expertise in purchasing run-down homes and refurbishing them.