We might earn a commission when you buy through links provided.
Baskets possess an almost enchanting ability to control disarray and mess. Nevertheless, purchasing them can become quite expensive, particularly if you’re looking to organize multiple areas within your house. Should your crafting storage, children’s bedroom, cooking zone, or restroom look like they’ve endured a whirlwind, then the do-it-yourself basket project shared by YouTuber Zhaidar will be just what you need. By using two inexpensive pails, fabric, macramé rope, and super glue, you can create your very own chic baskets to impose organization upon all those chaotic spots. Even with ample shelving available, baskets still serve as excellent organizers.
The cunning (and chic) method to amp up storage within your cabinets.
The two buckets featured in the tutorial have walls that go up straight vertically, similar to the
Geri 10-Pack White Plastic Buckets 2.6 Gallons Each
. You will need to ensure you have sufficient fabric to cover the exterior of your basket and create an inner lining as well. Begin by removing the rims from both buckets and taking out the base from one of them. Save one lid along with the detached base for crafting a stylish top for your basket. Secure the open-ended bucket onto the other using packing tape. Should regular cellophane tape prove insufficient in holding the buckets together, consider switching to masking tape or duct tape instead.
You can utilize square-shaped containers to form a more intriguing structure. When doing so, cut your material at an angle to ensure it fits tightly around the edges. Attach the covering fabric onto the container using super glue and then remove any extra bits. Rather than applying additional fabric internally, construct a lined sack by adhering to the provided instructions.
how to make your own duvet cover yourself
, but significantly reduced in size!
Read more:
The Item That Transforms Glass Yogurt Containers Into Charming Storage Solutions
Extra Instructions and Hints for Creating Your Personal Macrame Basket With a Lid
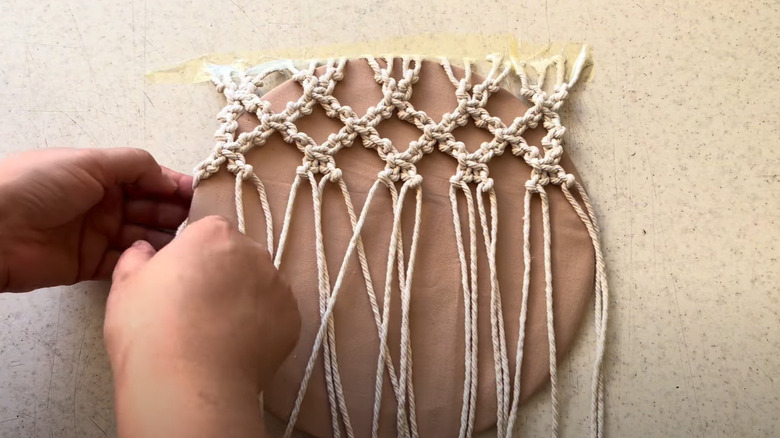
When securing your macramé cord along the edge, ensure you utilize an equal quantity of strands that are twice as long as the combined heights of both pails. Should you be new to macramé, look up online guides focusing on how to tie alternating half-hitch knots and square knots. Once these techniques become familiar, tackling this task will feel straightforward. Follow a sequence where each line consists of three repeating alternate half-hitches (left, right, left) followed by rows of square knots. Try out various hues for your cords to add visual interest.
Create a lid for your basket utilizing the bucket lid and the bottom part that has been detached. Adhere fabric to each circle, then join them together, and apply the same macramé design. The YouTuber employs a ring akin to this.
Mr. Pen Birch Wood Ring
As a grip, you might opt to add a strand of large beads or a macramé-knotted strap instead. After mastering this project, you can spruce up any area in your house without breaking the bank.
The styling of these baskets is entirely up to you. To achieve a natural appearance, choose neutral-colored fabrics; alternatively, go with bold contrasts using vividly colored fabrics paired with bright cords for a more striking basket. Since making them yourself offers complete creative freedom, feel free to tailor their design to complement your decor. Rather than purchasing fabric, you could also consider using an alternative material.
linens that are typically discarded can be reused rather than being tossed out
. Additionally, you can experiment with various bucket sizes to create an adaptable array of coordinating baskets that will seamlessly integrate into your area.
Liked this article? Sign up for expert home tips, DIY guides, and design inspiration from our newsletter.
House Digest newsletter
!
Read the
Original Article from House Digest
.