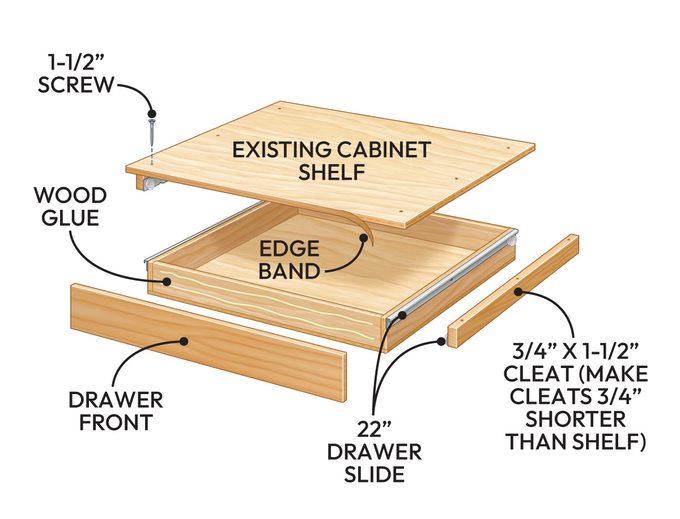
Rollout Drawer for Lids
A top-notch do-it-yourself cabinet organization project involves creating a holder specifically for your pot lids. This can be installed as a drawer beneath your pot storage area or underneath any other cabinet shelf. Below are the steps:
- Before removing the shelf, make sure to draw some lines with a pencil on it to show where the cabinet’s smallest opening is typically found (often near the hinges). Ensure your drawer face and slides do not go past these markings; otherwise, you might end up spending considerable time constructing a drawer that cannot be opened properly.
- Next, take off the shelf. Should it be constructed of particleboard, we suggest replacing it with 3/4-inch plywood and then transferring the markings onto the new shelf.
- Once you’ve constructed a basic drawer box, the remaining steps will be straightforward. Attach the drawer to cleats that are secured with screws into the side panels of the cabinet.
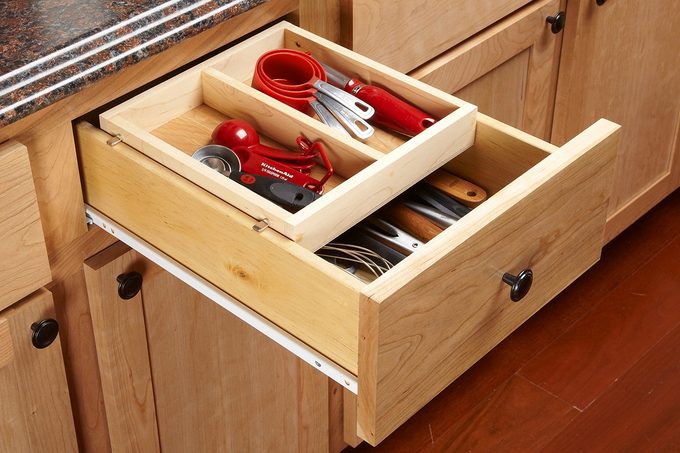
Drawer in a Drawer
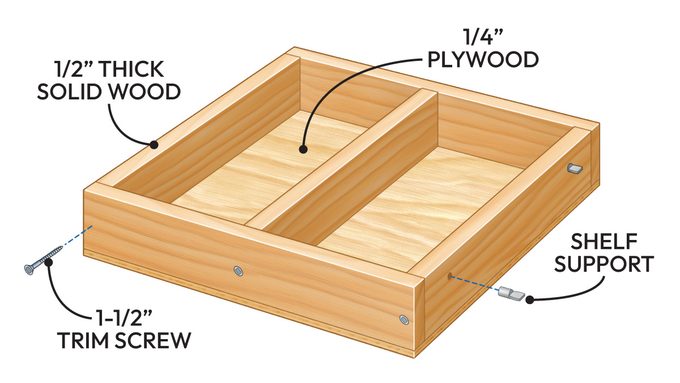
Large drawers frequently have an untidy mix of overlapping tools. We addressed this issue with a sliding tray that forms into two smaller compartments instead. Ensure your design is 1/8-inch thinner than the interior of the drawer, approximately half as long, and choose whatever depth suits your needs best. For instance, our version was constructed to be 1-3/4 inches deep.
When you position the holes for the adjustable shelf supports, don’t rely on measurements and arithmetic. Instead, position the tray inside the drawer box at least 1/8-in. lower than the cabinet opening and make a mark on the tray. Our shelf supports fit tightly into the holes, but yours may require a little super glue. This simple drawer rests on shelf supports.
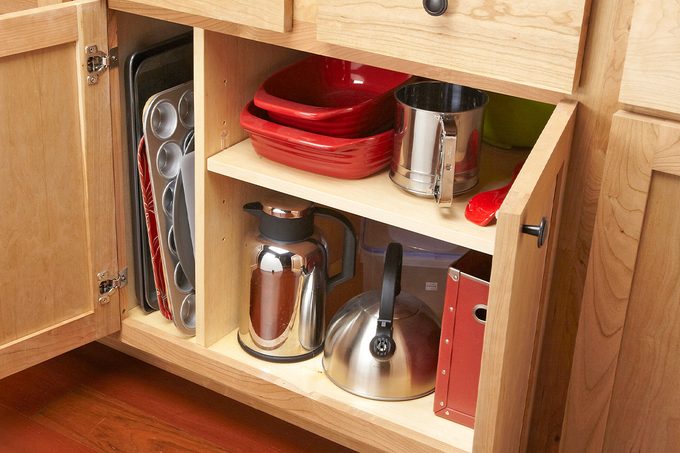
Insert a Separator for Vertical Storage
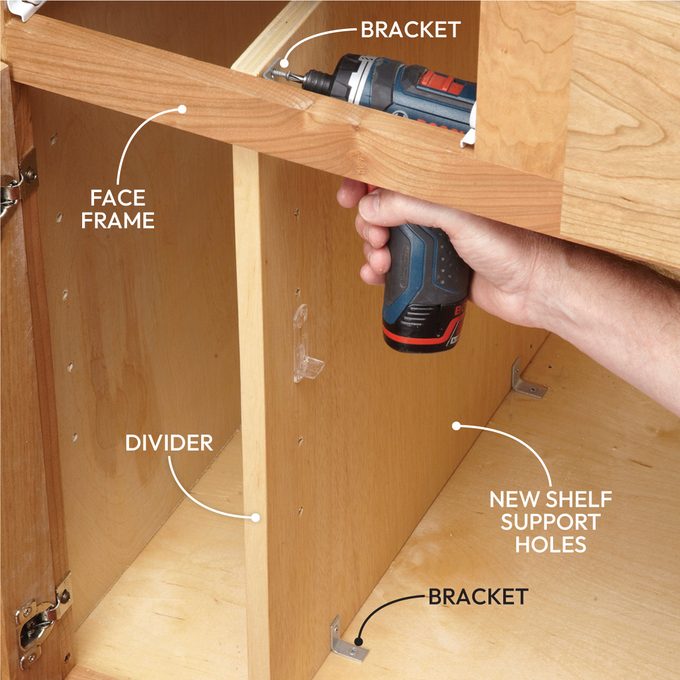
Of course the pan or tray you need is always the one at the bottom of the pile! There’s an easy solution: a DIY cabinet organizer. It will allow you to store large, flat item on their edges rather than stacked up. That way, you can slide out whichever pan you need.
- Cut 3/4-in. plywood to match the depth of the cabinet, but make it at least an inch taller than the opening so you can fasten it to the face frame as shown.
- Bore support holes into the drill shelf that align with the current holes within the cabinet.
- Attach two brackets to the bottom of the cabinet: one to the front edge of the face frame and another to the rear wall of the cabinet (the latter is not depicted).
- Ultimately, trim the existing shelf to match the new area.
Rollout Storage Panel
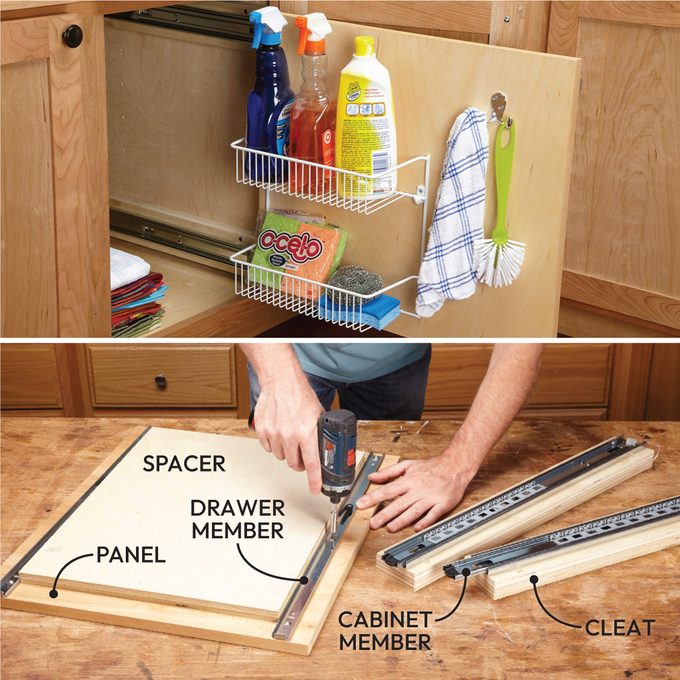
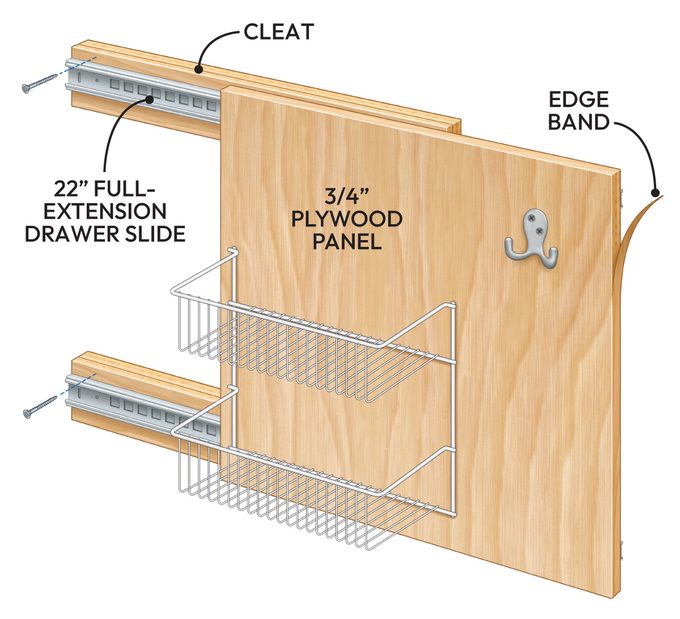
If you’re familiar with attaching a piece of plywood to drawer slides, you can make use of all those clever shelves, hooks, and organizers available at home improvement stores. Using these accessories can prevent tiny items from disappearing in large base cabinets.
It’s easy as long as you remember two critical things: First, make sure the drawer slides are parallel. Place a plywood spacer between the drawer members as you screw them to the panel. Screw the cabinet members to cleats. Second, make your cleats thick enough so that the slides will clear the cabinet door hinges. We glued 1/2-in. plywood to 3/4-in. plywood to make the cleats.
To mount the panel inside the cabinet, put together the slides again. Position the assembled unit against the back of the cabinet and push the panel outward approximately 4 inches. Secure screws into the cleats located at the rear, then pull the panel all the way out and attach screws at the front portion.
Cutting Board Storage
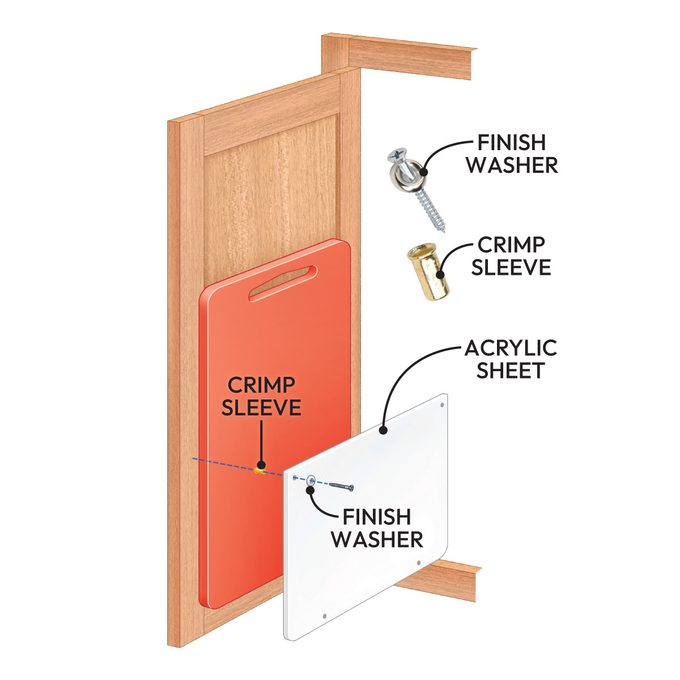
For storing cutting boards, install a rack on the inside of a cabinet door. Acrylic plastic at 1/4-inch thickness works well for this purpose, although plywood could be an alternative option too. Whether using a table saw or a circular saw, ensure slow cuts when working with acrylic. Smooth out the rough edges utilizing sandpaper before rounding off the bottom corners with a belt sander. As spacers, we utilized No. 14-8 crimp sleeves; however, tubes made from various materials or wooden blocks would serve equally effectively.
Hidden Cutting Board
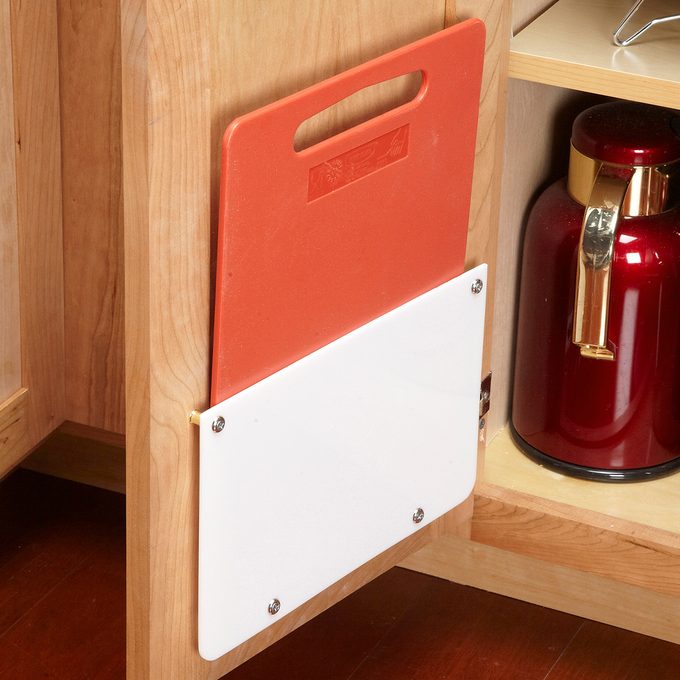
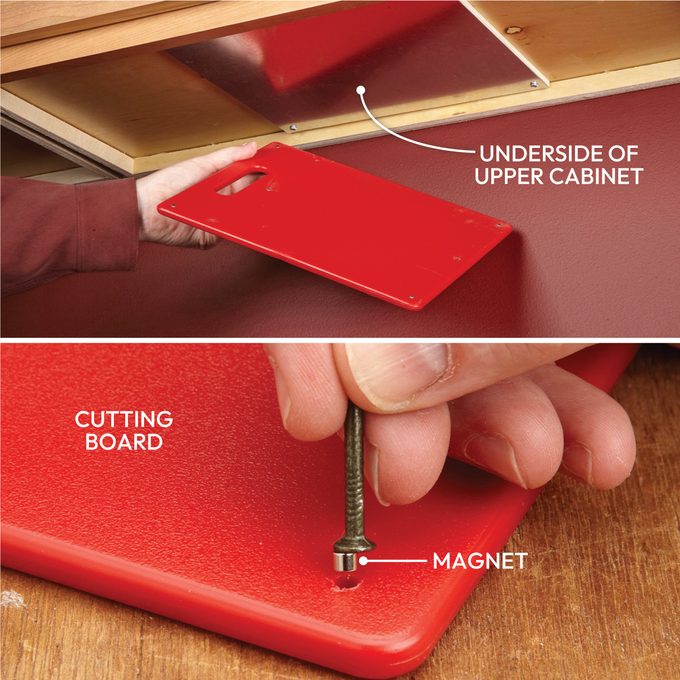
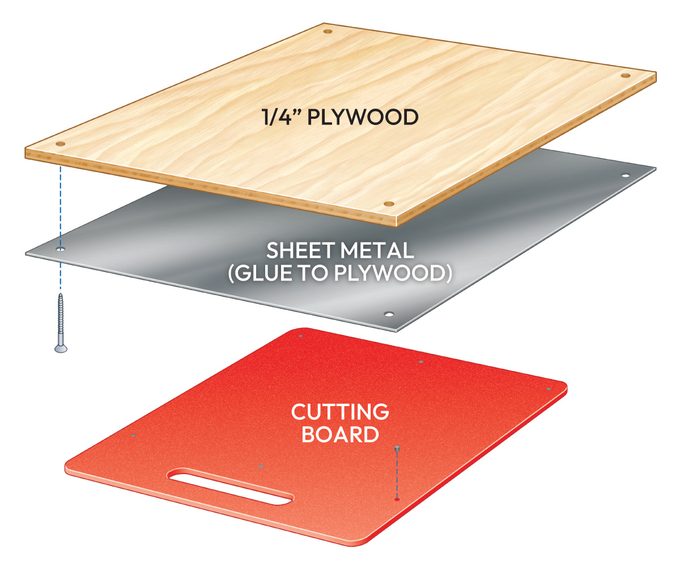
For this homemade cabinet organizer project, primarily you’ll require several tiny magnets. Attach these magnets at each corner of your cutting board; additional ones can be added as necessary. Ensure that the metal plate placed beneath the cabinet is bigger than the cutting board itself, facilitating smoother storage. Securely glue the sheet metal onto plywood using spray adhesive. Remember to utilize galvanized steel rather than aluminum for this task.
Punch holes close to the edges and secure the plywood beneath the cabinet using screws. Create openings suitable for the magnets and apply a small amount of strong adhesive inside these spots. Place the magnets with their nail heads sticking out. Move the nail horizontally so as to free the magnet. As you do this, the metallic sheet will attract and hold onto them firmly.

Flip-Down Paper Tray
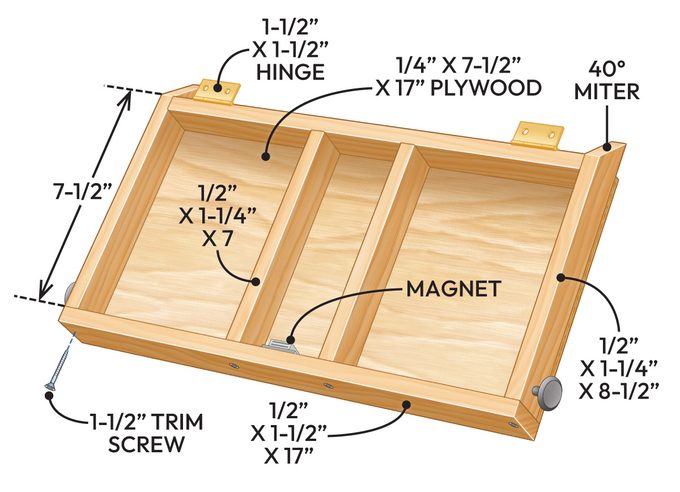
This tray works great for storing pens and paper. It remains largely concealed behind the cabinet face when shut. The installation involves using both hinges and magnets to secure the tray beneath an overhead cupboard. Begin by attaching the hinges with screws. Next, prop open the upper cabinet door, position the tray underneath securely, and fasten the hinges to the bottom of the cabinet as well.
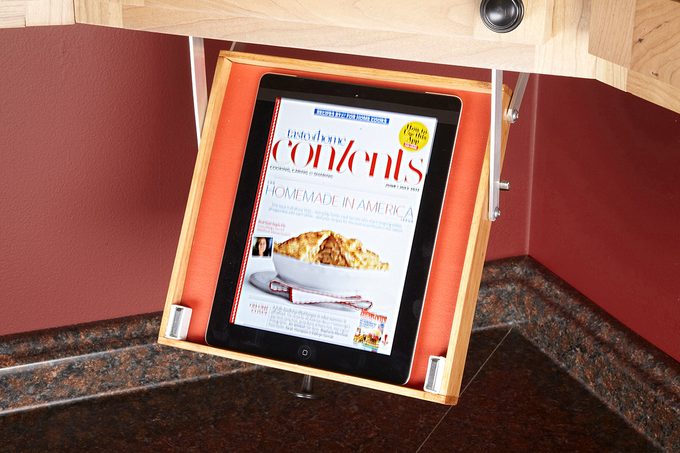
Drop-Down Tablet Tray
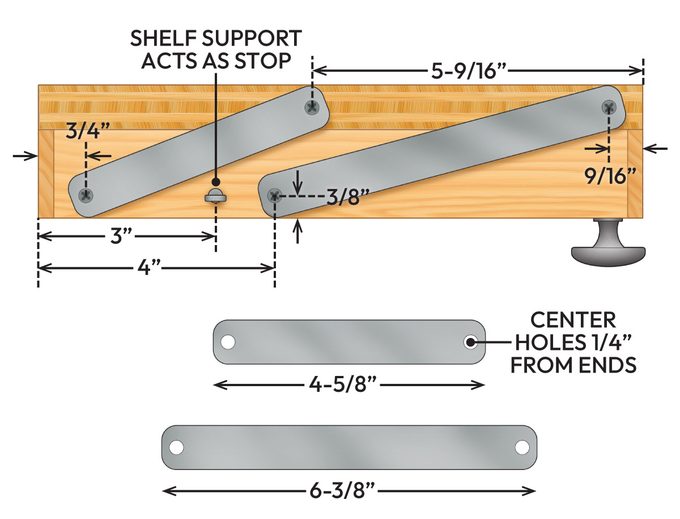
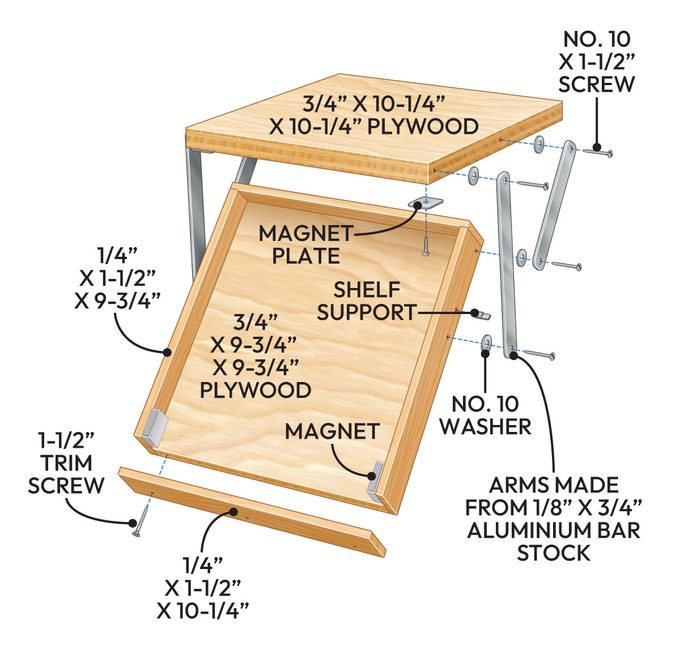
Keep your tablet handy and safe while you’re working in the kitchen. This tray will keep your tablet or other devices off the countertop. As it swings down, it also swings forward, so the tablet isn’t hidden under the cabinet. The mechanism is simple; just make and position the arms exactly as shown here and it will work smoothly.
We shaped the aluminum pieces and smoothed their edges using a grinder. Once shut, tiny cabinet door magnets secure the tray. We snipped off the plastic tabs from the magnets before securing them with epoxy glue. A foam trivet was trimmed to serve as the lining for the tray. This shelf can be folded upward against a piece of plywood at the top, making it an excellent choice for organizing your kitchen cabinets. Metal rods keep the tray steady. Do not fret; these little magnets will not affect your tablet.
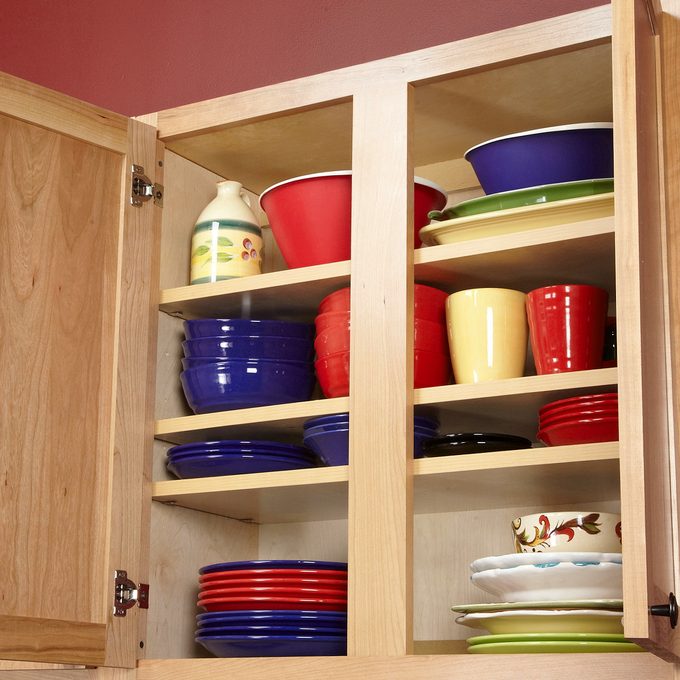
Add a Shelf
This do-it-yourself cabinet organizer initiative offers additional room for dishes and utensils in cramped kitchen cabinets. Typically, cabinets feature just one or two shelves, which often result in unused spaces. Increasing your storage capacity involves installing one or two extra shelves inside most of your cabinets. For this task, you’ll require 3/4-inch plywood along with a pack of shelf brackets. These brackets are available in different sizes, so ensure compatibility by bringing an old bracket to match when shopping at the hardware store.
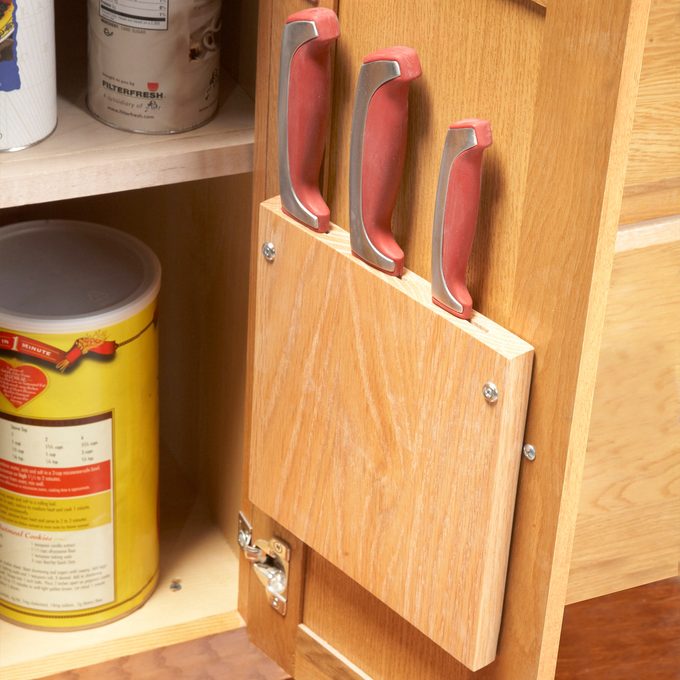
Cabinet Door Knife Rack
You can adjust this knife rack to fit any cabinet door and accommodate any desired number of knives for your kitchen cabinet organization. Constructing this cutting board-turned-knife rack requires only a table saw and some leftover wood pieces.
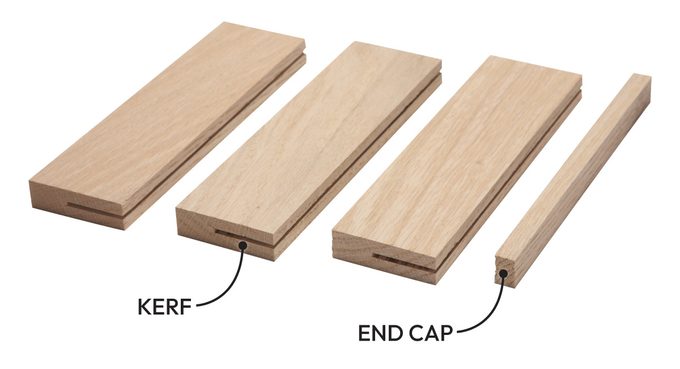
- Pass the scraps along the edge of the saw to cut grooves.
- Modify the blade height according to the width of the knives you’re using. Keep in mind that you’ll need to take off the saw’s blade guard for making these cuts, so exercise additional caution.
- Additionally, slice a narrow strip to serve as an end cap.
- Glue and clamp the kerfed scraps together and sand the knife rack until the joints are flush.
- To install it, use two 1-1/4-inch screws along with finish washers.

Drawer Dividers
This
DIY drawer divider project
Isn’t restricted to just your closet. You can adjust the designs for better drawer management too. Maintain organized measuring cups, establish a clear spatula sorting method, and avoid the frustration of cluttered drawers.